Adding Kotlin to a Java project – tutorial
Kotlin is fully interoperable with Java, so you can gradually introduce it into your existing Java projects without having to rewrite everything.
In this tutorial, you'll learn how to:
Set up Maven or Gradle build tools to compile both Java and Kotlin code.
Organize Java and Kotlin source files in your project directories.
Convert Java files to Kotlin using IntelliJ IDEA.
Project configuration
To add Kotlin to a Java project, you need to configure the project to use both Kotlin and Java, depending on the build tool you use.
The project configuration ensures that both Kotlin and Java code are compiled properly and can reference each other seamlessly.
Maven
To use Kotlin and Java together in a Maven project, apply the Kotlin Maven plugin and add Kotlin dependencies in your pom.xml file:
In the
<properties>section, add the Kotlin version property:<properties> <kotlin.version>2.3.10</kotlin.version> </properties>In the
<dependencies>section, add the required dependencies to the<plugins>section:<dependencies> <!-- Add JUnit Jupiter engine for test runtime --> <dependency> <groupId>org.junit.jupiter</groupId> <artifactId>junit-jupiter-engine</artifactId> <scope>test</scope> </dependency> <dependency> <groupId>org.junit.jupiter</groupId> <artifactId>junit-jupiter-params</artifactId> <scope>test</scope> </dependency> </dependencies>In the
<build><plugins>section, add the Kotlin plugin:<build> <pluginManagement><!-- Lock down plugin versions to avoid using Maven defaults (can be moved to a parent pom file) --> <plugins> <!-- No maven-compiler-plugin needed with Kotlin extensions --> </plugins> </pluginManagement> <plugins> <!-- Activate Kotlin Maven plugin for main and test sources --> <plugin> <groupId>org.jetbrains.kotlin</groupId> <artifactId>kotlin-maven-plugin</artifactId> <version>${kotlin.version}</version> <extensions>true</extensions> <executions> <execution> <id>default-compile</id> <phase>compile</phase> <configuration> <sourceDirs> <sourceDir>src/main/kotlin</sourceDir> <!-- Ensure Kotlin code can reference Java code --> <sourceDir>src/main/java</sourceDir> </sourceDirs> </configuration> </execution> <execution> <id>default-test-compile</id> <phase>test-compile</phase> <configuration> <sourceDirs> <sourceDir>src/test/kotlin</sourceDir> <sourceDir>src/test/java</sourceDir> </sourceDirs> </configuration> </execution> </executions> </plugin> </plugins> </build>In this configuration:
<extensions>true</extensions>lets Maven integrate the Kotlin plugin into the build lifecycle.Custom execution phases allow the Kotlin plugin to compile Kotlin first, then Java.
Kotlin and Java code can reference each other through the configured
sourceDirsdirectories.You don't need a separate
maven-compiler-pluginin the<build><pluginManagement>section when using the Kotlin Maven plugin with extensions.
Reload the Maven project in your IDE.
Run tests to verify the configuration:
./mvnw clean test
Gradle
To use Kotlin and Java together in a Gradle project, apply the Kotlin JVM plugin and add Kotlin dependencies in your build.gradle.kts file:
In the
plugins {}block, add the Kotlin JVM plugin:plugins { // Other plugins kotlin("jvm") version "2.3.10" }Set the JVM toolchain version to match your Java version:
kotlin { jvmToolchain(17) }This ensures Kotlin uses the same JDK version as your Java code.
In the
dependencies {}block, add thekotlin("test")library that provides Kotlin test utilities and integrates with JUnit:dependencies { // Other dependencies testImplementation(kotlin("test")) // Other test dependencies }Reload the Gradle project in your IDE.
Run your tests to verify the configuration:
./gradlew clean test
Project structure
With this configuration, you can mix Java and Kotlin files in the same source directories:
You can create these directories manually or let IntelliJ IDEA create them when you add your first Kotlin file.
The Kotlin plugin automatically recognizes both src/main/java and src/test/java directories, so you can keep .kt and .java files in the same directories.
Convert Java files to Kotlin
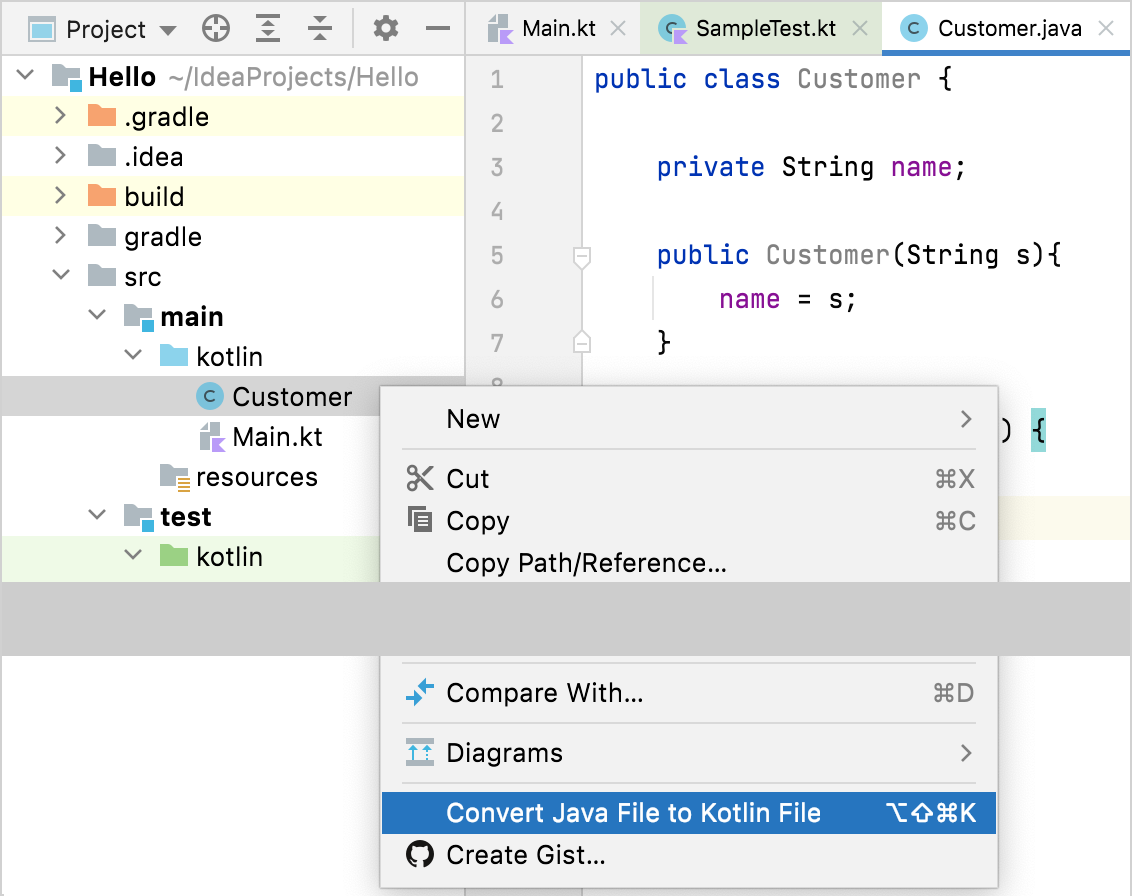
The Kotlin plugin also bundles a Java to Kotlin converter (J2K) that automatically converts Java files to Kotlin. To use J2K on a file, click Convert Java File to Kotlin File in its context menu or in the Code menu of IntelliJ IDEA.

While the converter is not fool-proof, it does a pretty decent job of converting most boilerplate code from Java to Kotlin. However, some manual tweaking is sometimes required.
Next step
The easiest way to start using Kotlin in a Java project is by adding Kotlin tests first:
Add your first Kotlin test to your Java project