Create a task manager app with Spring Boot and Claude
In this tutorial, you'll learn how to use Claude to create a Kotlin app to manage tasks. The tutorial uses Spring Boot to manage the backend infrastructure, while Claude plans and develops the application.
If you prefer to create an app without the help of AI, you can follow our Create a web app with Kotlin and Spring Boot tutorial.
Set up the environment
Download and install the latest version of IntelliJ IDEA.
Install the JetBrains AI Assistant.
Activate Claude Agent in one of the following ways:
Create a project
Create a new Spring Boot project in IntelliJ IDEA:
In IntelliJ IDEA, select File | New | Project.
In the panel on the left, select New Project | Spring Boot.
Specify the following fields and options in the New Project window:
Name: task-manager-demo
Language: Kotlin
Type: Gradle - Kotlin
Package name: org.jetbrains.kotlin.taskmanagerdemo
JDK: jbr-21
Java: 17

Make sure that you specified all the fields, then click Next.
Select the latest stable Spring Boot version in the Spring Boot field.
Select the Web | Spring Web dependency.

Click Create to generate and set up the project.
The IDE generates and opens the new project. It may take some time to download and import the project dependencies.
Create a development plan
In your project:
Open the
 AI Chat tool window. By default, the Chat mode is selected. Select Claude Agent.
Click Mode: Default
 and select Mode: Plan Mode. Claude Agent is now ready to plan without executing actions.
Write a prompt asking Claude to create a task manager app. Share some details on what you think it should include. For example:
I'd like to create a task manager application for managing tasks, such as a grocery list. It should have a basic UI and include categories, due dates, priorities, and status tracking. Use VCS while working. Work step by step and create commits at each stage so I can review the changes afterward.Claude explores the existing project structure and suggests a plan.
Review the plan carefully before proceeding. If you want to make some modifications, select No, keep planning and share your follow-up comments.
When you're ready to proceed, select the Yes ... option that fits how much control you want over Claude's changes.

Claude exits Plan Mode and begins working. Wait until the work is complete.
Review the commits
Before running the app, review the generated changes carefully:
Open the Git tool window to see the list of commits.
Select a commit and double-click each modified file to review the diff in IntelliJ IDEA's side-by-side viewer.

Run the app
Once you are happy with the changes, run the app:
Run the
bootRunGradle task or enter the following command in the terminal:./gradlew bootRunIn a browser, open the localhost URL. The default is usually:
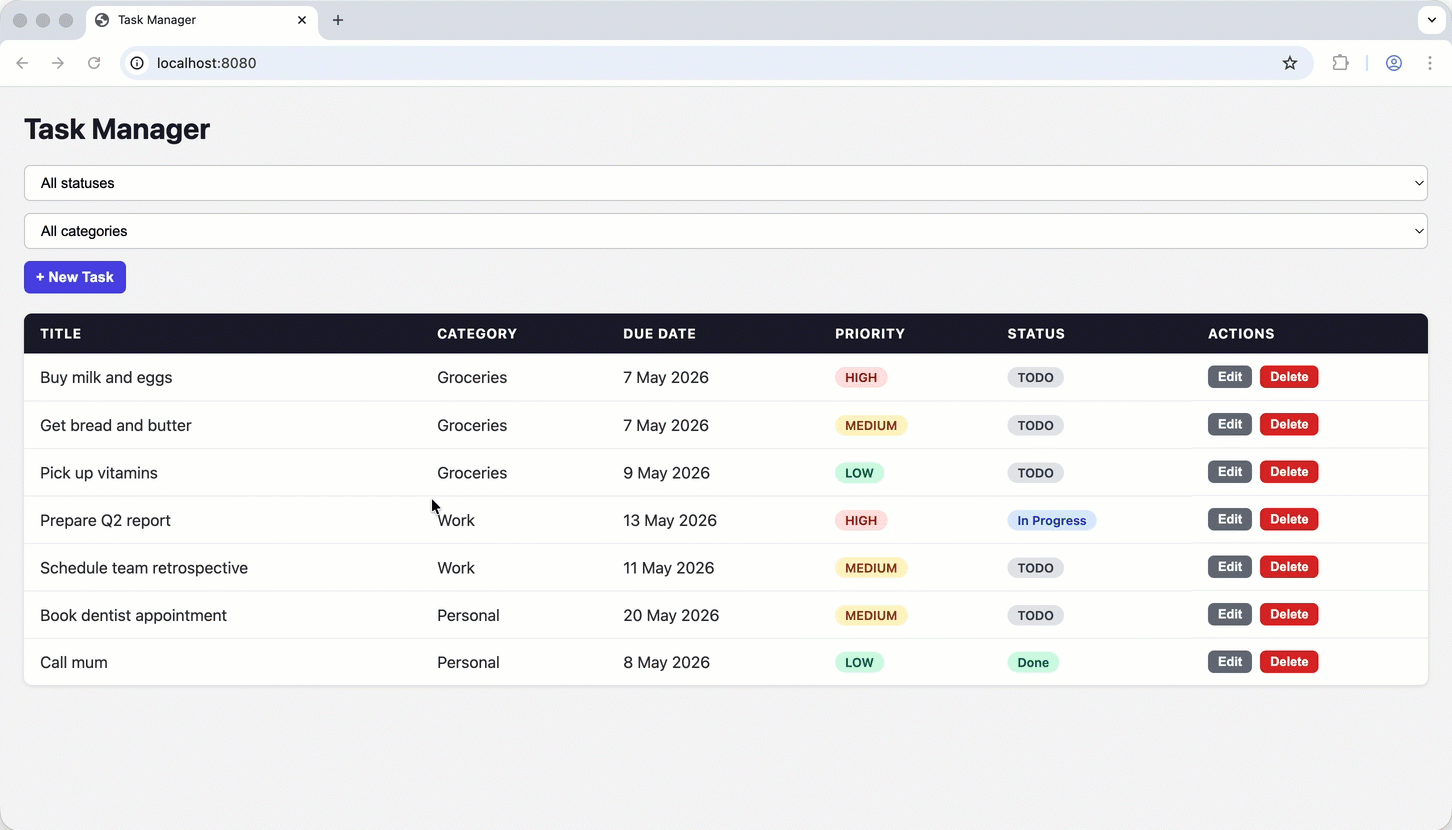
http://localhost:8080You should now see the basic UI that Claude created.

Test the app
Now it's time for you to test the app.
Test the UI manually
Start by testing the UI functionality. Try some simple actions:
Create a task and test the form fields.
Edit a task to check that changes persist.
Change the status of a task.
Delete a task.
Change the category of a task.
If any of these actions don't work, send a new prompt to Claude asking it to investigate and fix the problem.
Run unit tests
Claude also creates some tests automatically. Check that all the tests pass by running:
Alternatively, in the src/test directory, open a test and click the run icon ![]() in the gutter. A successful test shows
in the gutter. A successful test shows ![]() .
.
If any test doesn't work, send a new prompt to Claude asking it to investigate and fix the problem.
Make refinements
Now that the initial task is complete, you can make refinements. For example, let's improve the UI so users can edit tasks directly in the list.
You can send a prompt like:
Just as before, Claude explores the existing project structure and suggests a plan. After you accept the plan, wait for Claude to finish, review the changes, and then run the app again.
Congratulations! You used Claude to plan, build, test, and refine a Kotlin Spring Boot application directly in IntelliJ IDEA.
What's next?
Learn about Kotlin AI skills
Check out our tutorial on using Junie with Kotlin AI skills