Native UI: Shared logic for REST API requests
This tutorial shows how to share code for certain business logic while implementing separate UIs in native code. For an example of sharing both logic and UI, see Fully shared code: Time zone picker app.
You'll create an application that retrieves information about the most recent successful space launch from the Launch Library 2 REST API and displays the result. The networking and data serialization code will be shared between iOS and Android.
To get from a project created by the Kotlin Multiplatform IDE wizard to the final result, you will:
Set up API requests and the data model for storing responses
Consume and display the data in native UIs:
Update the iOS UI. You'll be able to try out two different libraries for integrating Kotlin coroutines into Swift code.
Create a project
With the IDE and the Kotlin Multiplatform IDE plugin installed, create a new Kotlin Multiplatform project:
In IntelliJ IDEA, select File | New | Project.
In the panel on the left, select Kotlin Multiplatform.
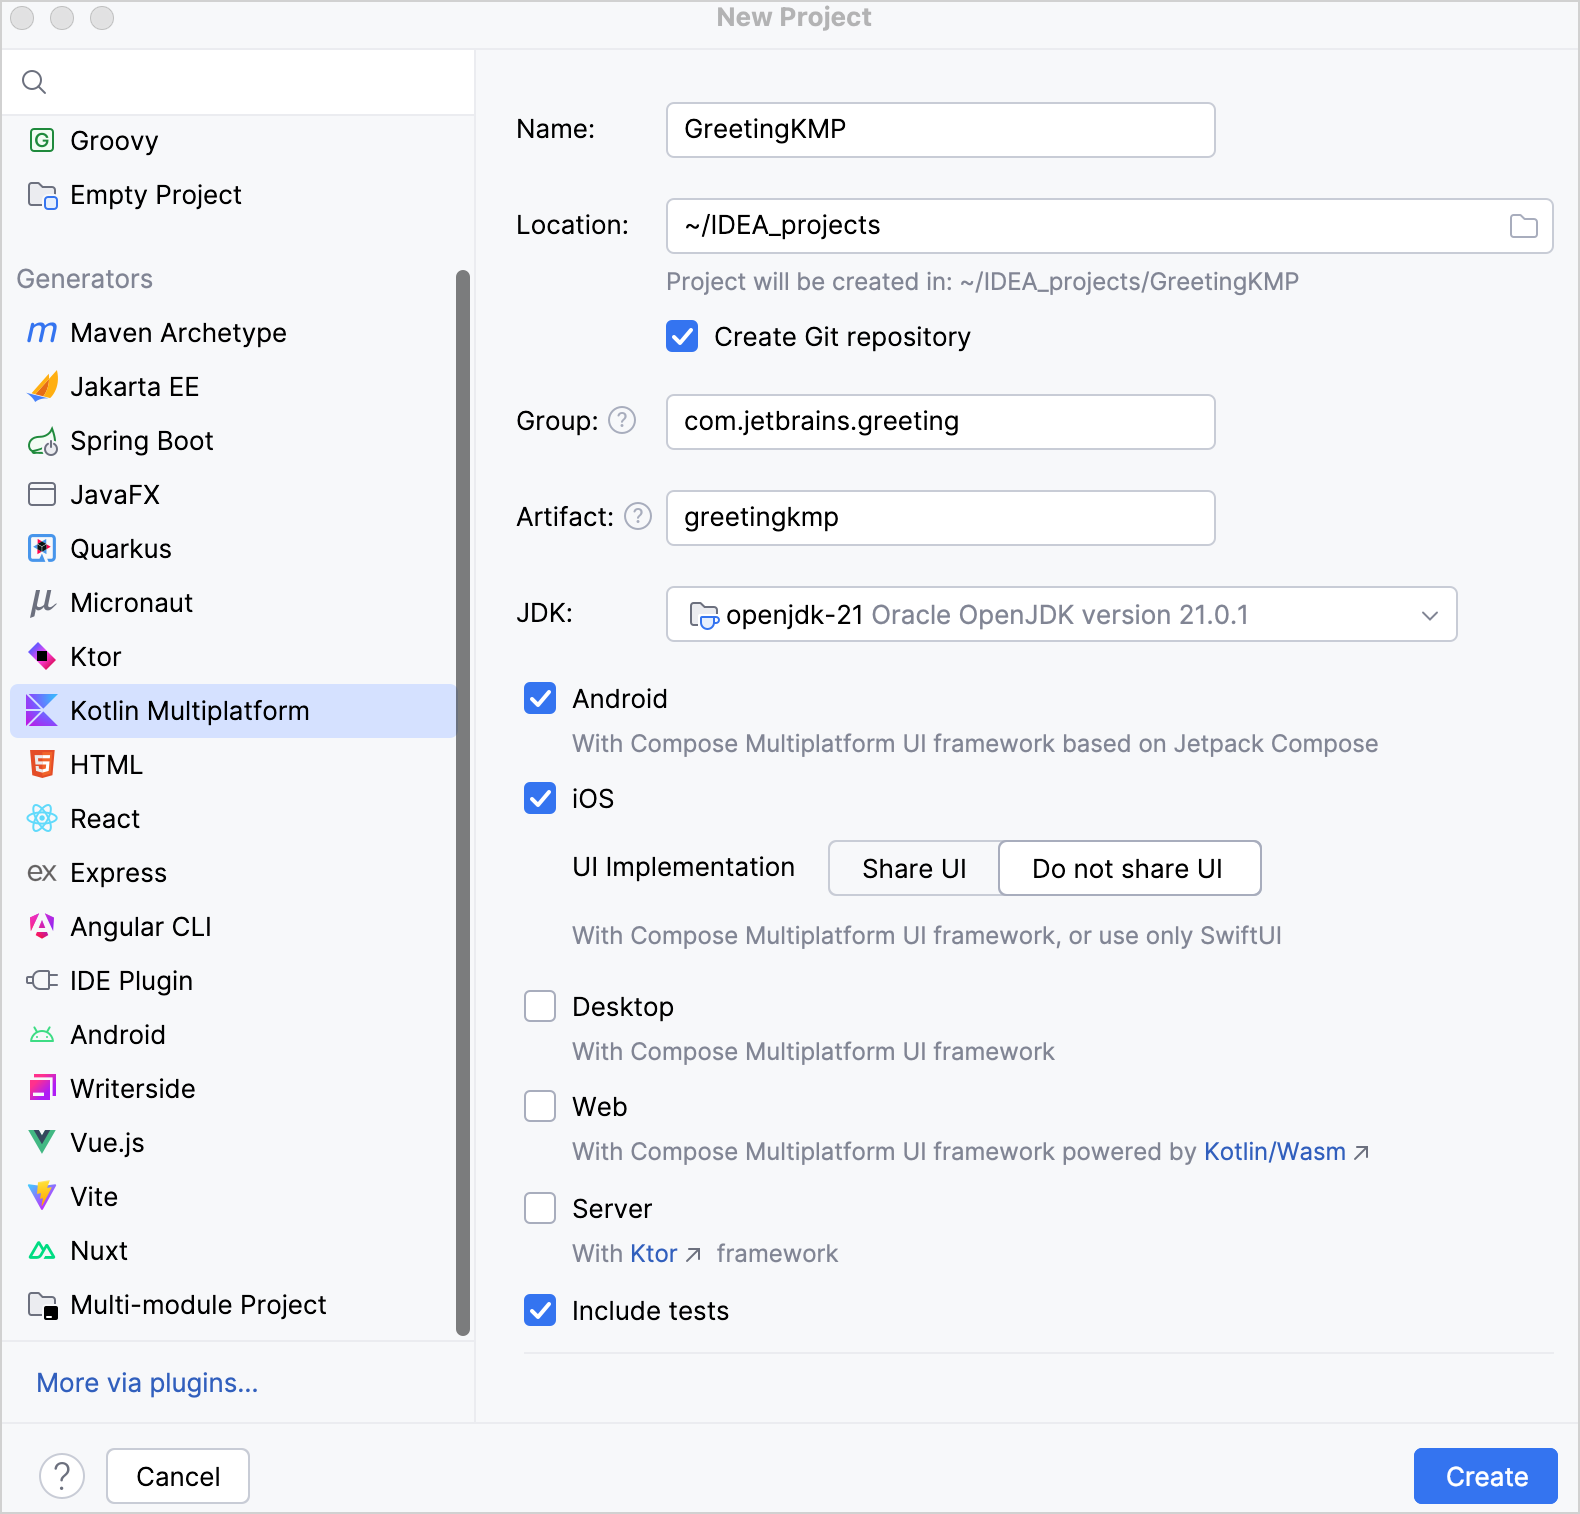
Specify the following fields in the New Project window:
Name: GreetingKMP
Project ID (used as the package name): com.jetbrains.greetingkmp
Select the Android and iOS targets. For iOS, select the Do not share UI option to keep the UI native.
Click Create.
The first import takes a couple of minutes. After it is done, make sure that all preflight checks are green (View | Tool Windows | Projects Environment Preflight Checks).
Examine the project structure
In IntelliJ IDEA, expand the GreetingKMP folder.
The Kotlin Multiplatform project includes the following modules:
androidApp is a Kotlin module that builds the Android application. It uses Gradle as the build system. The androidApp module depends on and uses the sharedLogic module as a regular Android library.
iosApp is the Xcode project that builds the iOS application.
sharedLogic is the multiplatform module that contains the logic shared by the Android and iOS applications.
sharedUI is the module with the UI code implemented with Compose Multiplatform. In this project, sharedUI is used only by the Android app but can be extended to other targets whenever you need that. On Android, Compose Multiplatform calls directly translate into Jetpack Compose, so there is no overhead in this particular setup.
Every module except for iosApp uses Gradle as the build system. The iosApp module is built with Xcode that invokes the Kotlin Gradle build to create an iOS framework from the sharedLogic module. This is an example of direct iOS integration in Kotlin Multiplatform.
Add dependencies
Your project requires the following multiplatform libraries:
kotlinx-datetime, to process and format timestamps.Ktor, a framework for sending and retrieving data over HTTP.
kotlinx.coroutines, to process network calls asynchronously using coroutine flows.kotlinx.serialization, to deserialize JSON responses of the API into Kotlin objects.
All platform-specific code is wrapped in platform artifacts of the libraries, so you don't have to implement platform-specific calls yourself.
Native iOS UI will require an additional library to bridge asynchronous code between Swift and Kotlin. This configuration is covered after the common API is ready for consumption, in the Update native iOS UI section.
Update the Gradle version catalog
Add the following entries to gradle/libs.versions.toml, then sync Gradle files to make the references available in build configuration code:
Add dependencies to corresponding source sets
Add the library references to corresponding source sets in the sharedLogic/build.gradle.kts file:
Synchronize the Gradle files: press double Shift, then find and execute the Sync Project with Gradle Files command.
Set up API requests
You'll use the Launch Library API to retrieve data, specifically a list of launches from the /2.3.0/launches endpoint.
Create a data model
In the sharedLogic/src/commonMain/.../greetingkmp directory, create a new RocketLaunch.kt file and add a data class which stores data from the Launch Library API:
Connect HTTP client
In the
sharedLogic/src/commonMain/.../greetingkmpdirectory, create a newRocketComponentclass.Add the
httpClientproperty and use it to build the final string from the result of an HTTP GET request:import io.ktor.client.HttpClient import io.ktor.client.call.body import io.ktor.client.plugins.contentnegotiation.ContentNegotiation import io.ktor.client.request.get import io.ktor.serialization.kotlinx.json.json import kotlinx.datetime.TimeZone import kotlinx.datetime.toLocalDateTime import kotlinx.serialization.json.Json import kotlin.time.Instant class RocketComponent { private val httpClient = HttpClient { // ContentNegotiation Ktor plugin and the JSON serializer // deserialize the result of the GET request install(ContentNegotiation) { json(Json { // Produces more readable JSON prettyPrint = true // Allows non-standard JSON input, // such as unquoted keys and string values isLenient = true // Ignores keys that haven't been declared in the model ignoreUnknownKeys = true }) } } // Returns the date string for the latest successful launch. // Marked as suspending because it calls // the suspending httpClient.get() function private suspend fun getDateOfLastSuccessfulLaunch(): String { // Asynchronously retrieves information about rocket launches val response: LaunchListResponse = httpClient.get("https://lldev.thespacedevs.com/2.3.0/launches/previous/?mode=list&limit=10&format=json").body() // Gets the latest successful launch. // In the response, launches are sorted from newest to oldest, // and successful launches are marked with 'status.id' 3 val lastSuccessLaunch = response.results.first { it.status.id == 3 } // Converts the launch timestamp to local time val date = Instant.parse(lastSuccessLaunch.launchDateUTC) .toLocalDateTime(TimeZone.currentSystemDefault()) // Date is displayed in the "MMMM D, YYYY" format, // for example, "JULY 15, 2026" return "${date.month} ${date.day}, ${date.year}" } // Builds the final string for the UI using // the suspending getDateOfLastSuccessfulLaunch() function suspend fun launchPhrase(): String = try { "The last successful launch was on ${getDateOfLastSuccessfulLaunch()} 🚀" } catch (e: Exception) { println("Exception during getting the date of the last successful launch $e") "Error occurred" } }Suspending functions can only be called from coroutines or other suspending functions. For example,
httpClient.get()is a suspending function because it needs to retrieve data over the network asynchronously without blocking threads. Since thegetDateOfLastSuccessfulLaunch()function callshttpClient.get(), it's also marked with thesuspendkeyword.
Create a coroutine flow
Instead of simply calling a suspending function, you can use flows when you need to produce a sequence of values. Flows can emit a sequence of values as the values are produced instead of returning a single value like suspending functions.
Open the
Greeting.ktfile in thesharedLogic/src/commonMain/kotlindirectory.Update the
greet()function in theGreetingclass to return aFlowof strings, primarily to accommodate the network request. In theFlow, emit the launch date using aRocketComponentproperty:import kotlinx.coroutines.delay import kotlinx.coroutines.flow.Flow import kotlinx.coroutines.flow.flow import kotlin.random.Random import kotlin.time.Duration.Companion.seconds class Greeting { private val platform = getPlatform() // Stores the last successful launch date private val rocketComponent = RocketComponent() // Builds and asynchronously emits greeting strings one by one fun greet(): Flow<String> = flow { emit(if (Random.nextBoolean()) "Hi!" else "Hello!") delay(1.seconds) emit("Guess what this is! > ${platform.name.reversed()}") emit(rocketComponent.launchPhrase()) } }The
Flowis created with theflow()builder function that wraps a suspendable block.
The greet() function now returns Flow<String> instead of a single String. Your native UI code will import the Greeting class and collect strings emitted by the greet() function.
Implement the corresponding changes in native UIs as shown in the following sections.
Update native Android UI
As both the shared module and the Android application are written in Kotlin, using shared code from Android is straightforward.
Introduce a view model
View models are commonly used in Android development to manage UI-related data throughout the lifecycle of an Android activity. Your application is becoming more complex, so it can benefit from a view model as well. The view model will store the data received from the Launch Library API and make it available to the UI.
In the sharedUI/src/commonMain/.../greetingkmp directory, create a new MainViewModel class that extends [ViewModel](https://developer.android.com/reference/kotlin/androidx/lifecycle/ViewModel) from the multiplatform AndroidX library to use Android's lifecycle mechanism and configuration tracking:
Use the view model's flow
In sharedUI/src/commonMain/.../greetingkmp, open the App.kt file and replace the previous implementation to use the newly implemented view model.
As the flow emits new values, the composition updates to display the greeting phrases one by one:
Add internet access permission
To allow the Android application to access the internet, add the following permission to the androidApp/src/main/AndroidManifest.xml file:
Run the app
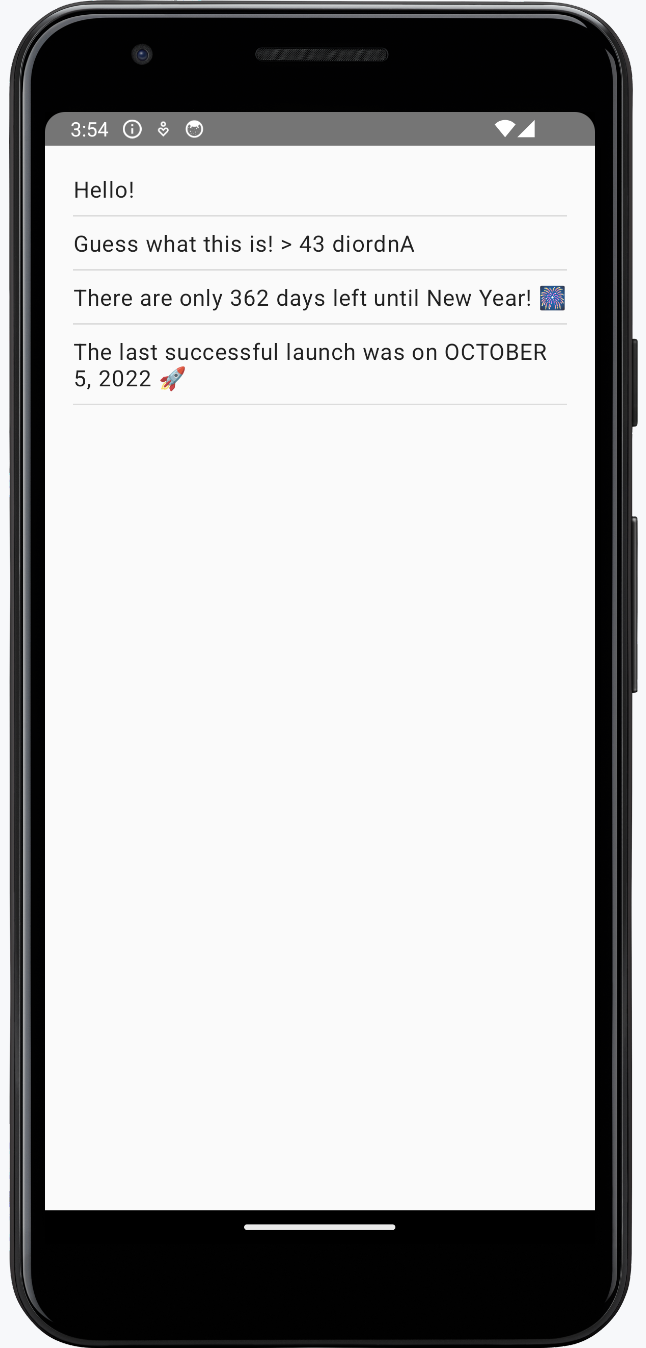
To see the final result, run your androidApp run configuration.
Update native iOS UI
For the iOS part of the project, you'll make use of the view model pattern, like you did for the Android app, to connect the UI to the sharedLogic module. The module is already imported in the ContentView.swift file with the import SharedLogic declaration.
The code for the iOS app is contained in the iosApp/iosApp directory: ContentView.swift holds the bulk of the logic, and iOSApp.swift holds the app's entry point.
Introduce a ViewModel
In the iosApp/ContentView.swift file, create a ViewModel class for ContentView, which will prepare and manage data for it. Replace the entire file with the following code:
SwiftUI connects the view model (ContentView.ViewModel) with the view (ContentView):
The
ContentView.ViewModelclass is declared as anObservableObjectwhich lets it report changes. The@ObservedObjectwrapper for theviewModelproperty inContentViewsubscribes the view to these changes.Changes to the
greetingsproperty, which has the@Publishedwrapper, trigger SwiftUI to updateContentView.
Now you need to implement the startObserving() function with one of the available KMP libraries that can consume Kotlin flows in Swift.
Choose a library for consuming Kotlin flows in Swift
In this tutorial, you can use SKIE or the KMP-NativeCoroutines library to help you work with flows in iOS. Both are open-source solutions that support cancellation and generics with flows, which the Kotlin/Native compiler doesn't yet provide by default:
The KMP-NativeCoroutines library helps you consume suspending functions and flows from iOS by generating the necessary wrappers. KMP-NativeCoroutines supports Swift's
async/awaitfunctionality as well as Combine and RxSwift. Using KMP-NativeCoroutines requires adding a SwiftPM or CocoaPod dependency in iOS projects.The SKIE library augments the Objective-C API produced by the Kotlin compiler: SKIE transforms flows into an equivalent of Swift's
AsyncSequence. SKIE directly supports Swift'sasync/await, without thread restriction, and with automatic bidirectional cancellation (Combine and RxSwift require adapters). SKIE offers other features to produce a Swift-friendly API from Kotlin, including bridging various Kotlin types to Swift equivalents. It also doesn't require adding additional dependencies in iOS projects.
Option 1. Configure KMP-NativeCoroutines
Update the build scripts to include KMP-NativeCoroutines dependencies:
Add the KMP-NativeCoroutines version and plugin reference to the Gradle version catalog:
[versions] kmpNativeCoroutines = "1.0.6" [plugins] kmpNativeCoroutines = { id = "com.rickclephas.kmp.nativecoroutines", version.ref = "kmpNativeCoroutines" }In the root
build.gradle.ktsfile of your project (not thesharedLogic/build.gradle.ktsfile), add the KMP-NativeCoroutines plugin to theplugins {}block:plugins { // ... alias(libs.plugins.kmpNativeCoroutines) apply false }In the
sharedLogic/build.gradle.ktsfile, add the KMP-NativeCoroutines plugin to theplugins {}block:plugins { // ... alias(libs.plugins.kmpNativeCoroutines) }In the same
sharedLogic/build.gradle.ktsfile, opt-in to the experimental@ObjCNameannotation:kotlin { // ... sourceSets { all { languageSettings { optIn("kotlin.experimental.ExperimentalObjCName") } } // ... } }Press double Shift, then find and execute the Sync Project with Gradle Files command.
Mark the flow with KMP-NativeCoroutines
Open the
Greeting.ktfile in thesharedLogic/src/commonMain/kotlindirectory.Add the
@NativeCoroutinesannotation to thegreet()function. This makes the plugin generate the code to support correct flow handling on iOS:import com.rickclephas.kmp.nativecoroutines.NativeCoroutines class Greeting { // ... @NativeCoroutines fun greet(): Flow<String> = flow { // ... } }
Import the library using SwiftPM in Xcode
Install the parts of the KMP-NativeCoroutines Swift package necessary to work with the async/await mechanism:
Go to File | Open Project in Xcode.
In Xcode, right-click the
iosAppproject in the left-hand menu and select Add Package Dependencies.In the search bar, enter the package name:
https://github.com/rickclephas/KMP-NativeCoroutines.git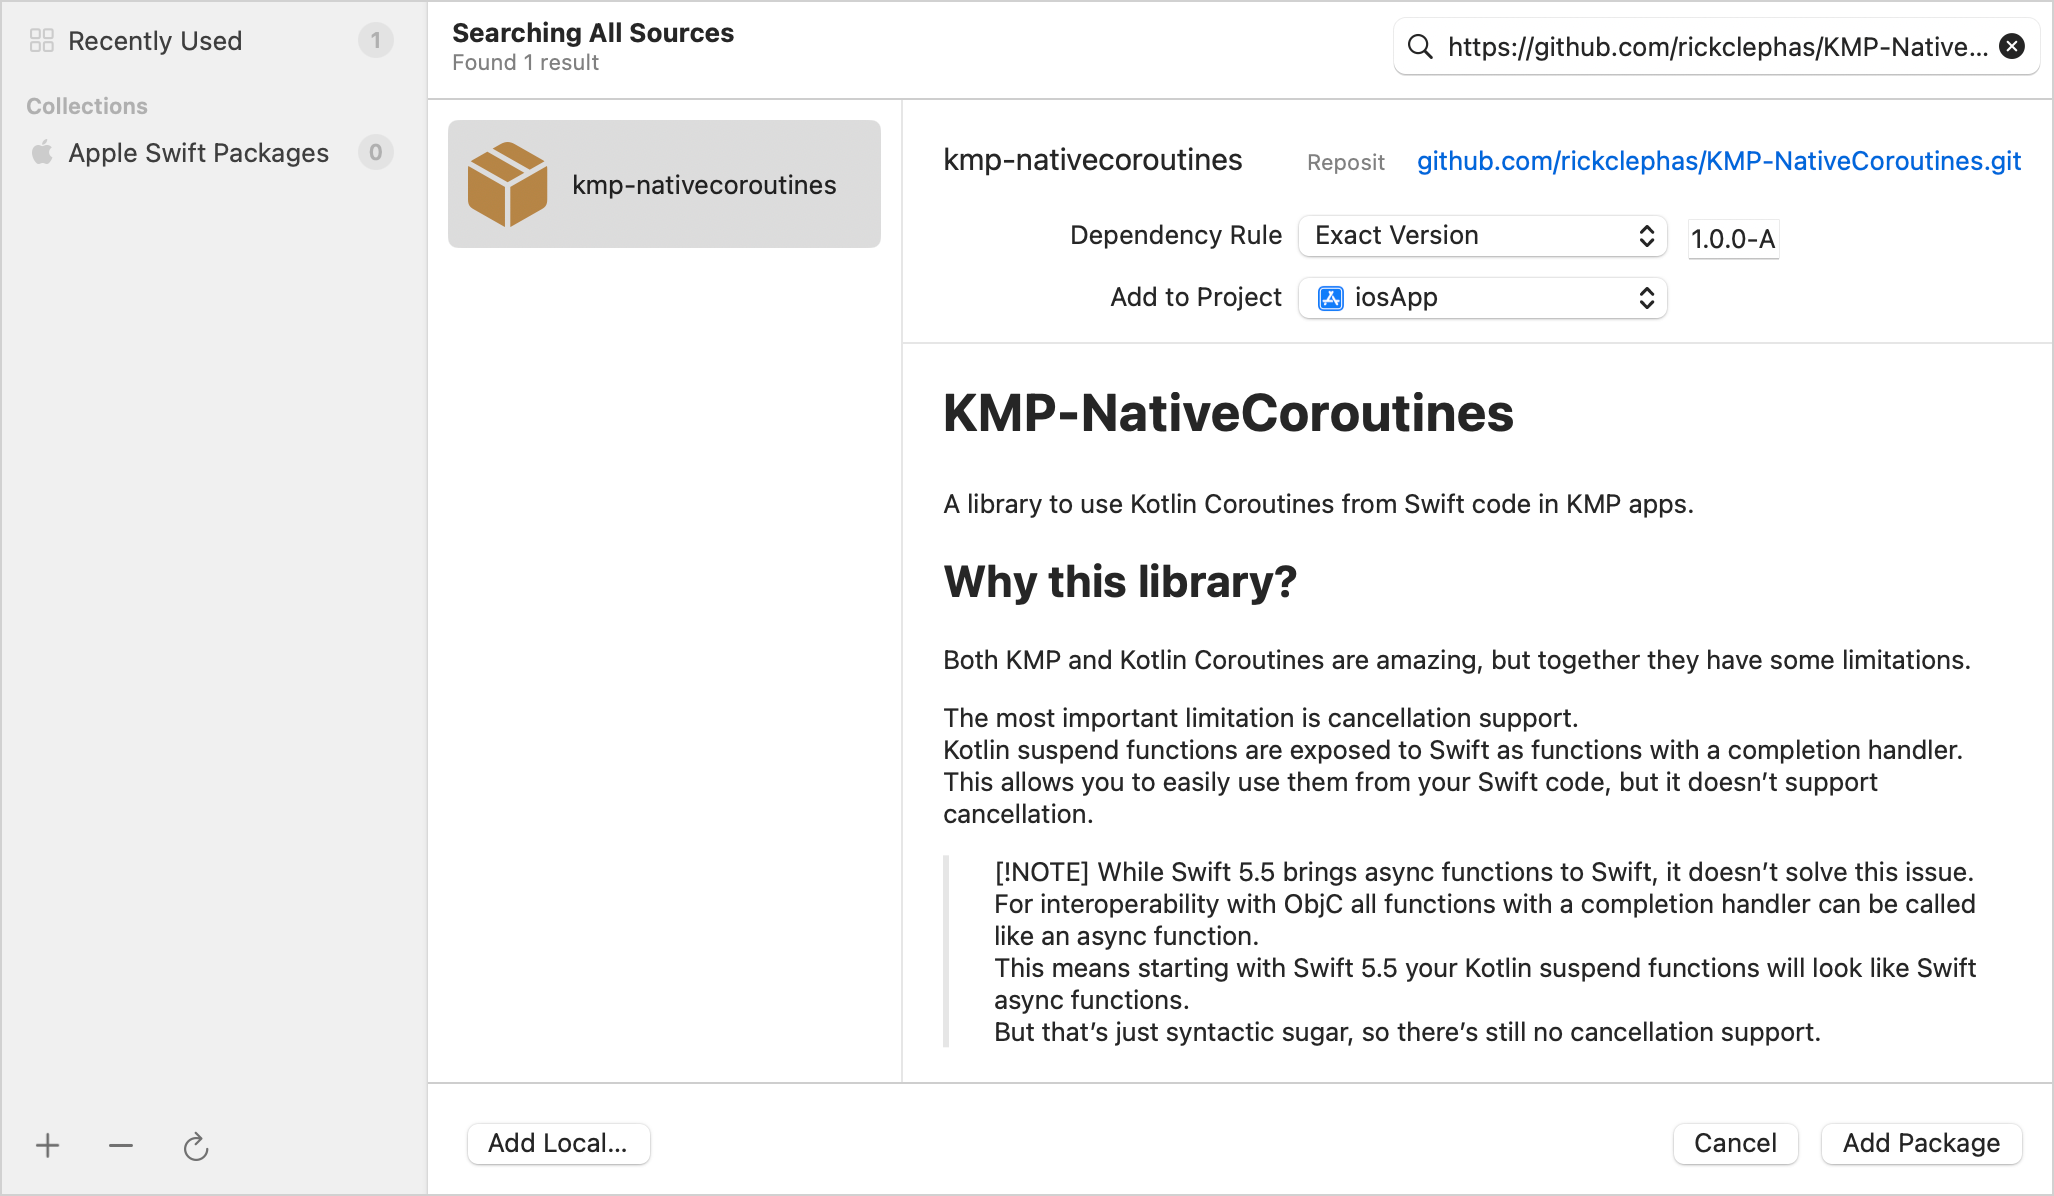
In the Dependency Rule dropdown, select the Exact Version item and enter the
1.0.6version in the adjacent field.Click the Add Package button. Xcode will fetch the package from GitHub and open another window to choose package products.
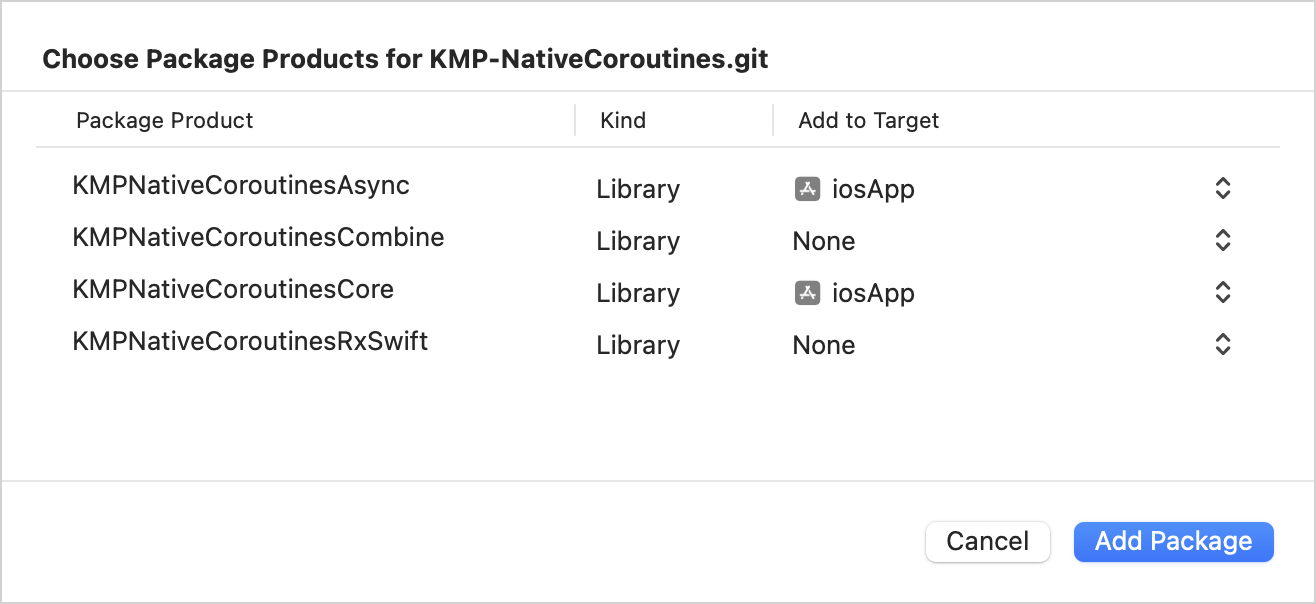
Add KMPNativeCoroutinesAsync and KMPNativeCoroutinesCore to your app as shown, then click Add Package:
Return to IntelliJ IDEA and select Tools | Swift Package Manager | Resolve Dependencies. This creates a
Package.resolvedlock file that is used by the Kotlin Multiplatform build task and can be committed to the repository to keep the versions of Swift packages consistent.
Consume the flow using the KMP-NativeCoroutines library
In
iosApp/ContentView.swift, update thestartObserving()function to consume the flow using theasyncSequence()function from KMP-NativeCoroutines:func startObserving() async { do { // Consumes the flow emitted by Greeting().greet() from Kotlin let sequence = asyncSequence(for: Greeting().greet()) for try await phrase in sequence { self.greetings.append(phrase) } } catch { print("Failed with error: \(error)") } }The loop and the
awaitmechanism are used here to iterate through the flow and update thegreetingsproperty every time the flow emits a value.Make sure
ViewModelis marked with the@MainActorannotation:// ... import KMPNativeCoroutinesAsync import KMPNativeCoroutinesCore // ... extension ContentView { // Ensures that all asynchronous operations within `ViewModel` // run within the main UI context of the app. // This avoids updates to the `@Published` property // that are not reflected in the UI. @MainActor class ViewModel: ObservableObject { @Published var greetings: [String] = [] func startObserving() async { do { let sequence = asyncSequence(for: Greeting().greet()) for try await phrase in sequence { self.greetings.append(phrase) } } catch { print("Failed with error: \(error)") } } } }
@MainActor here can produce unresolved reference errors until you build the project, which brings the Kotlin symbols (specifically, greet()) in sync with the iOS project dependencies.
Option 2. Configure SKIE
To set up the library, add the SKIE version and plugin reference to your Gradle version catalog:
Then add it to the list of plugins in the sharedLogic/build.gradle.kts file:
Press double Shift, then find and execute the Sync Project with Gradle Files command.
Consume the flow using SKIE
You'll use a loop and the await mechanism to iterate through the Greeting().greet() flow and update the greetings property every time the flow emits a value.
Make sure ViewModel is marked with the @MainActor annotation. The annotation ensures that all asynchronous operations within ViewModel run on the main thread to comply with the Kotlin/Native requirement:
Consume the ViewModel and run the iOS app
In iosApp/iOSApp.swift, update the entry point for your app:
Run the iosApp configuration from IntelliJ IDEA to make sure your app's logic is synced.
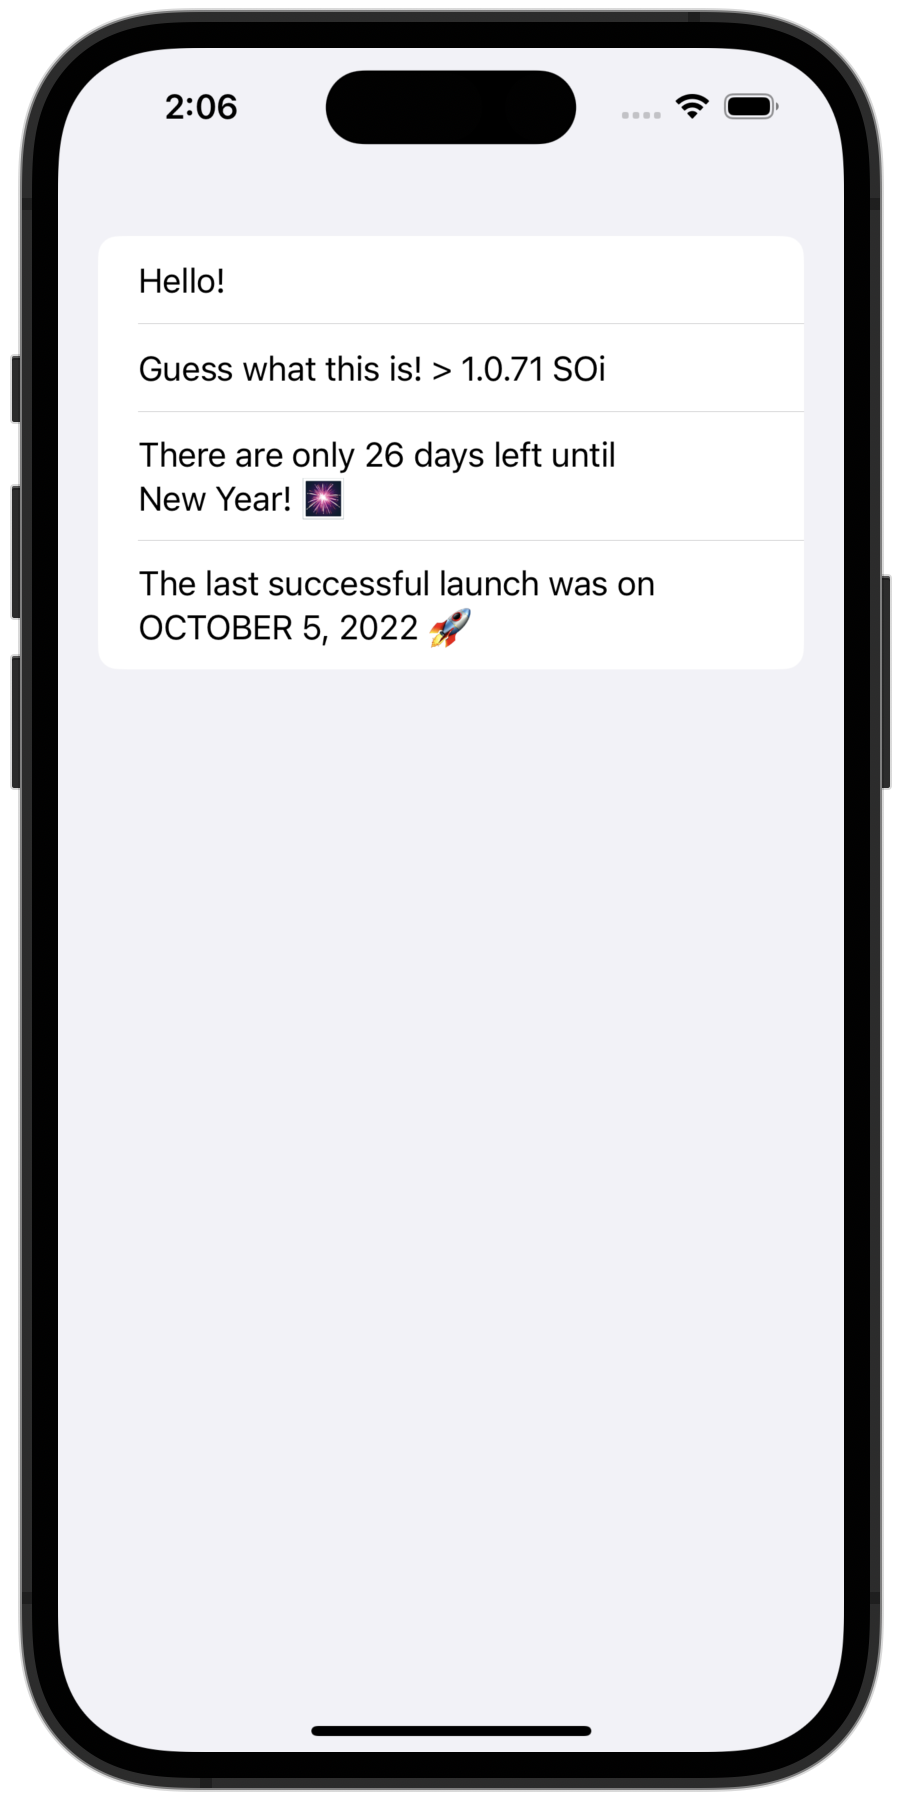
Final state of the project
You can find the final state of the project in two branches of our GitHub repository, with different coroutine solutions:
Possible issues and solutions
Xcode reports errors in the code calling the shared framework
If you work in Xcode, your Xcode project may be using an old version of the framework. To resolve this, return to IntelliJ IDEA or Android Studio and rebuild the project or start the iOS run configuration.
Xcode reports an error when importing the shared framework
If you are using Xcode, you may need to clear cached binaries: Try resetting the environment by choosing Product | Clean Build Folder in the main menu.
What's next
See an alternative tutorial, where the UI code is shared as well.
To learn of the various approaches to sharing code that Kotlin Multiplatform supports, see Share code between platforms.
Learn about the principles behind the structure of a Kotlin Multiplatform project.
For more information on how to manage multiplatform dependencies, see Adding dependencies on multiplatform libraries.
See how a Kotlin Multiplatform project can be integrated with an iOS app.
Create a more complex KMP app following the tutorial on networking and data storage.
Explore various approaches to composition of suspending functions.
Get help
 Kotlin Slack: Get help and participate in discussions about KMP and Compose Multiplatform. Request an invitation and join the #multiplatform channel.
Kotlin issue tracker: Report a new issue.